Author Archives: tillbortels

Email “Domain availability notice” – what to do?

When you own a domain, chances are that every now and then you will receive an email with the subject “Domain X availability notice”. Sometimes there is also the domain name in the subject line “Domain X” and the sender sometimes is named “Domain Available Info” or the like.

And sometimes there are even several emails coming in, all from different “experts” that are basically just trying to make you buy some additional domain name from them. But is it all ‘just’ spam?

In most cases the suggested domain name “Domain X” is close to a domain name you already own – either the ending or some other detail is different, the rest looks pretty similar to your own domain. For example I recently had an offer for “cpu20.info” which is pretty close to the domain “cpu20.com”. But what should one do in such a case?

“ I just wanted to let you know that domain EXAMPLE is now/soon available again and we are brokering the sale. Since you have a related domain name we thought you might have some interest in this one? „

In most cases these services are professional domain brokers – sometimes also called Domain Grabbers.

What are Domain Grabbers? Are they allowed to do what they do?

If you are like me, your first reaction may not be the most positive. Basically domains should only be registered by people, companies and institutions, that have a direct interst in the domain name. That’s at least what the guidelines of the Internic say – the central registration authority. But still Domain Grabbers do register domains names just for later selling them for a much higher price. Such practice is possible, but from a legal point of view at least questionable. Practically there is very little one can do against such practice.

Often Domain Grabbers simply “catch” domains that are about to “fall”. If the previous owner has no further interest in his/her domain name, the domain name would normally expire and then be freely available. Catching a falling domain will register the domain right the moment it becomes available. And that makes it almost impossible for ‘normal’ prople to register a domain that once was registered.

What can you do?

There are basically just three options, what you can do, when you are offered such a domain name:

  1. Hire a Domain-Grabber
    You really want to own the domain that was offered to you? It may hurt both financially and morally, but one way to get hold on that domain is to actually hire a/the Domain Grabber. Depending on the service and on the domain you might have to pay a fee ranging from a couple of hundreds to whatever you are willing to pay. Good luck!
  2. Register the Domain Name yourself
    You can of course also hope that you are either quicker than the Domain Grabber, or that the service has no interest in registering the domain themselves. All you have to do is wait and see if the domain becomes available. In this case I would recommend not to answer – not even to click on any link provided in any of the emails you received by that service. Any action can be interpreted ‘positive interest’ which might make the Domain Grabber actually grab the domain. This tactic can work out, but it can of course also go wrong. Good luck!
  3. Register an Alternative Domain Name
    This is the easiest and cheapest option, in case you really want an additional domain name that is close to the one you already have. This may feel a bit frustrating in the beginning, but once you get over the ‘lost’ opportunity, you might even like your very own choice better than the one offered to you by some domain service. The success of a website / the search result positioning can of course also be influenced by the domain name itself – but in the end it’s the content, that matters. And additionally you may get a good feeling not having fed a system that is at least questionable. If nobody would feed the domain grabbers, their business idea simply would not work.

Update: In an actual case I just managed to stay patient – and then actually register the very same domain name that was first offered to me / my client by a “domain service”. We first discussed the above options and then decided to wait. And in the end it paid off. Yay!
WooCommerce SEO: change the default shop title ‘Products Archive’ to something meaningful

WooCommerce SEO: How to change shop title Product Archive

WooCommerce SEO - how to change the shop title - Photo: screenshot / montage by T.Bortels/cpu20.com

As you may already know, WooCommerce is a free WordPress plugin – and for many website owners it has basically become the standard e-commerce solution – an affordable and rather easy to set up way to run an online shop.

The combination of WordPress and WooCommerce enables you run an online shop with relatively little time and money invested. You basically just need to install WordPress and the free e-commerce plugin WooCommerce and in a few minutes you could have an online shop up and running. But then you would probably want to get some details straight – and that be get a little complicated.

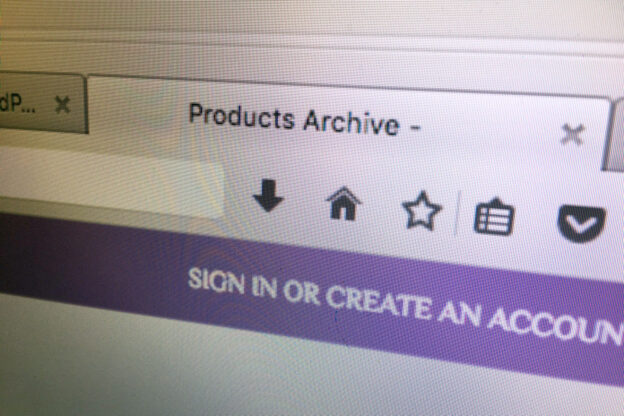
One of the details you should actually get straight from the very beginning (or at least  sooner or later) is the title that is displayed in the title bar of your browser when visiting the archive pages – that is the category pages your new WooCommerce powered shop. Often the importance of the title bar can be overseen – but it is an important SEO factor. At least when you bookmark your shop or see it listed in a search engine results page (SERP) you’ll probably see why it is so important. The content of the title bar is basically what a potential client sees even before he/she visits your shop.  So I would even like to call it the most important – or at least one of the most important details to get straight if you want to run a successful online shop. And since category pages / archive pages often rank rather well, and  people are often searching for such categories, the archive titles are a good start. Depending on the theme you use, you might also see “Products Archive” as the title for your shop page. Not very search engine friendly – not very customer friendly.

WooCommerce SEO 101 – get the title straight first

With many shop themes, in case you don’t change anything to the default settings, the new landing page of your shop – your store front page will first have the default title “Products Archive” – and I suppose you don’t really like that. And you may also want to change the title if ‘only’ the category pages have the “Archives” in the title. At least search engines and potential customers will not find that title very useful information. If you would leave the title as it is, you would waste a great SEO potential.

Chances are that you first don’t even realize that the page has this standard title. The WordPress/WooCommerce interface lets you change the page title – and so you may have the impression that everything is ok as it is. But the title that is shown in the browser bar and will then also be shown in the search results is probably still the default title.

Changing the WooCommerce-Shop-Title “Products Archive“ with Yoast

The SEO plugin Yoast lets you change the title with a few clicks to something more meaningful. Basically every merchant should sooner or later think about search engine optimization (SEO) and the free version of Yoast is a good start. So you better install that plugin now, if you haven’t already installed it anyways.

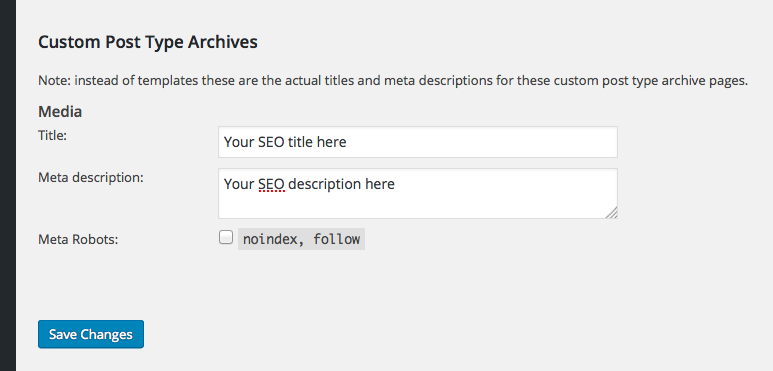
Wordpress Woocommerce SEO Shop TitleTo change the title you have to first click on SEO in the left side menu of your admin section. Then navigate to “SEO > Titles & Metas“. On that oage you should see a tab “Post Types”. Click on it, then scroll down all the way to the section “Custom Post Type Archives” where you can change how the default title for archive pages of custom post types (shop articles) is constructed. Now you can for example enter the name of your shop directly into that field – something like “Buy myStuff Online” or the like. I suppose you get the idea :) and Bob’s your uncle.

WordPress as a CMS: Page Management Plugins (CPT)

WordPress CMS – Page Management Plugins

WordPress CMS – Page Management Plugins – Photo/montage: T.Bortels/cpu20.com

When using WordPress as a CMS, the blog functionality can become less important than the handling of static pages. And I mean lots of pages. If you are using WordPress as a CMS for a while, you could be dealing with hundreds or even thousands of pages. And it is probably quite common that there are also additional Custom Post Types (CPT) to be managed. So things can become a bit difficult

With one of my current projects I ran into the situation that I would have a couple of thousand pages in a hierarchical tree – all Custom Post Type (CPT) pages. The built-in page management is not really practical in such a situation, so I was looking at some plugins to help me out.

Usually first everything works fine. But the more pages you have, the more tricky managing those pages can become. This is even more the case, when you are dealing with hierarchical pages. Chances are sooner or later the built in page management doesn’t really work anymore and you would want to have plugin that helps you managing your to help me out managing the pages.

In the past years different WordPress developers have built a number of plugins that are intended to be helpful when dealing with a large number of pages. Some seem to do their job ok, some don’t. I have done some research: I had a closer look at 5 of the probably most popular plugins and I found a combination that kind f works for me. Here’s the details:

Plugin #1: Admin Collapse Subpages

The Plugin Admin Collapse Subpages does not help me at all. All it does is add an option to the standard pages list to collapse parent-child pages. The problem is, that the collapse-option  applies to the pages that are listed on the default list. So if you happen to have 50 child pages on your first parent page, you won’t see the next parent page. Sorry, but this plugin seems to be useless – at least for my use case.

Plugin #2: Advanced Page Manager

The second Plugin I had a closer look at was  Advanced Page Manager. At first sight the plugin looks really promising. But soon after the installation process I realized I couldn’t use this plugin either – the plugin does not support Custom Post Types (CPT).  So if you happen to have the need to manage a large number of regular parent-child pages, you may want to have a closer look at Advanced Page Manager.

Plugin #3: Swifty Page Manager

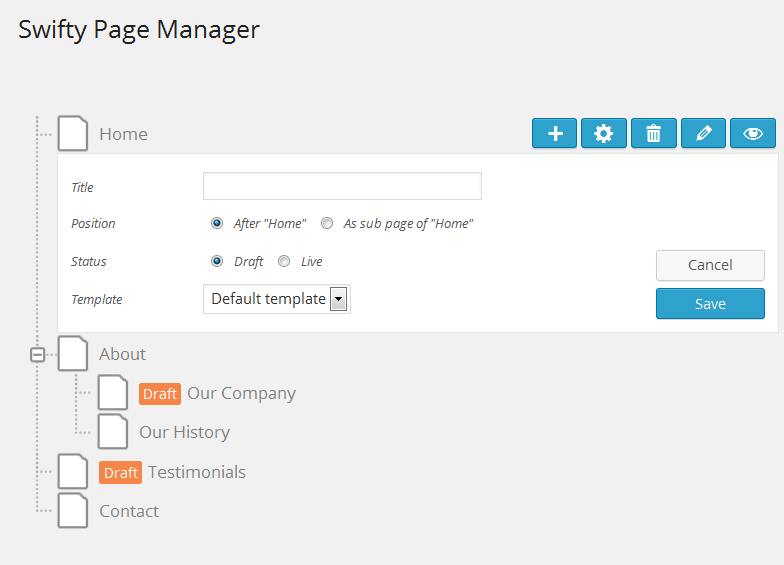
At first the Plugin called Swifty Page Manager does make a very good impression. it looks well designed, clean and easy to use. Parent pages can be expanded and collapsed, new child pages can be added directly inside the list view in the admin section and you can even choose the template you want to use. The list view does even show the little green / yellow / red light, provided by the SEO plugin Yoast. Greatness.

Wordpress Page Management with Swifty Page Manager

UI of Swifty Page Manager

For my use case however I could not use the plugin, since currently the plugin does not know how to handle Custom Post Type pages. And according to the developers there seems to be not much hope for CPT users: “there are no plans for adding custom post types at this point“. Not so great.

But I do have actually some hope: the plugin is (of course) released with an Open Source License – and the developers are actually encouraging others to help further develop this plugin and add missing functionalities. We’ll see if that turns out right at some point in the future.

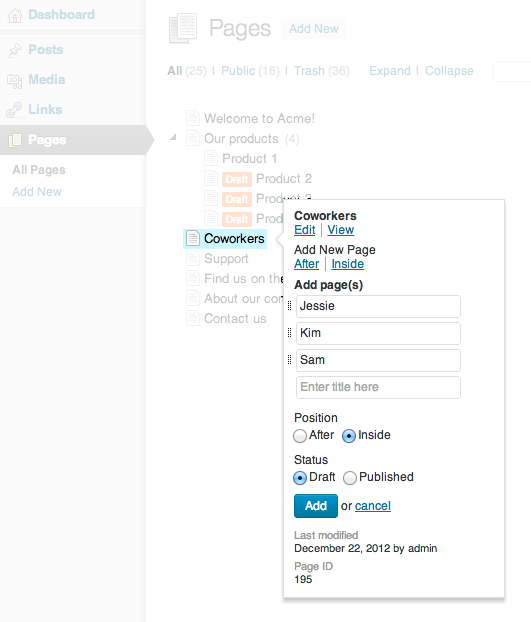
Plugin #4: CMS Tree Page View

Next on the list is the plugin CMS Tree Page View. This plugin enables you to manage actually quite complex page trees. Even with a couple of thousand pages the plugin still works comfortably smooth. AJAX requests only load the details you currently need. Child pages are only loaded when the parent page is expanded – loading time and file size are ok.

Wordpress-Plugin CMS Tree Page View

CMS Tree Page View

The page listing is quite reduced and may look a bit like a 90ies computer interface: very small grey folder icons stand for parent folders, very small grey document icons stand for child pages. Reminds me a bit of  “Windows Explorer” that would let you organize folders and documents on your PC in the mid-nineties.

The Plugin does actually support Custom Post Types – a feature that was quite important to me.

Parent pages and child pages can be re-arranged by Drag’n’Drop – but that can turn out to be a bit difficult. Folders are constantly expanding once you move some page near a parent page. You may have to try a couple of times before you hit the right spot “between” to folders.

Plugin #5: Nested Pages

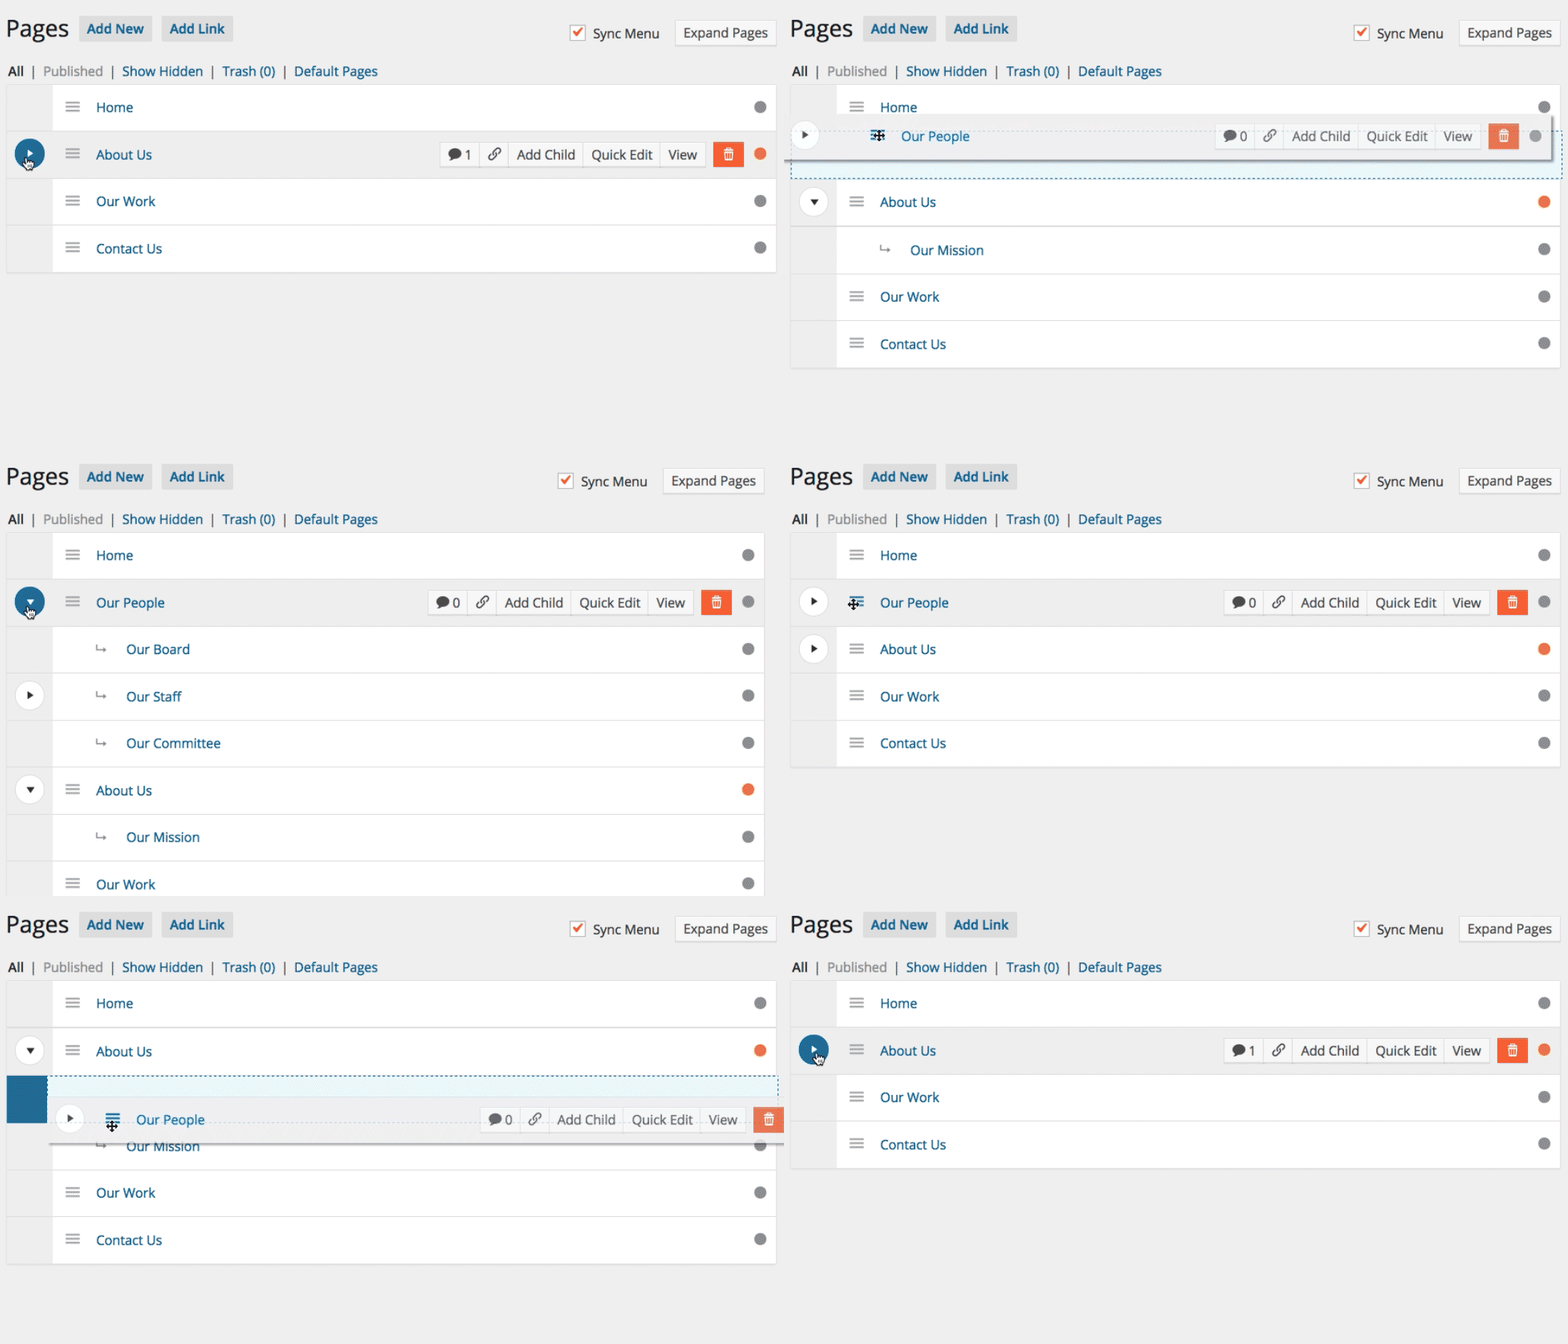
The user interface of Nested Pages is very clean and almost beautiful. And the Plugin is also capable of handling CPT pages. Clearly two strong arguments pro Nested Pages. And this is also why I first enjoyed using the plugin.

Wordpress Plugin WP Nested Pages

WP Nested Pages

Also Nested Pages indicated the SEO-ranking of Yoast directly in the page listing – another feature that would come handy.

But there is also a great disadvantage: Nested Pages seems to load all the pages, before it displayed the page tree. This can be very comfortable when you’re dealing with only some dozens of pages – but it clearly does not work well with a couple of thousand pages. Or actually it does work, but the overall handling becomes just very slow.

WordPress as a CMS – Page Management Plugins roundup / TLDR

If Nested Pages would load child pages through AJAX, this would be my favorite plugin to handle large / complex CPT page trees. But unfortunately it does not – and the more pages I add, the less I find the plugin useful.

At the moment I use the plugin CMS Tree Page View. You could actually run both plugins at the same time – so maybe I will use CMS Tree Page View for managing CPT pages and Nested Pages for checking the SEO status of my pages from time to time. We’ll see.

Basically there is just one more thing to add: all of the tested plugins can be activated and deactivated as you like. So you can actually try them out yourself and see what’s best for your project.

PS: You have some additional / alternative suggestion?
Please feel free to leave a comment below… Thank you!

How to check your WordPress Version easily

Sometimes you want to install a new theme or upgrade a plugin and then you might be wondering – what wordpress version is my website actually running on? When did I update the last time? Is the theme / the plugin compatible to the version I use?

You may also need your WordPress version when you are about to post a support request or want to implement a custom function / a custom functionality yourself.So knowing where to actually find the version can came in handy every now and then.

Check your WordPress Version in the Administration Dashboard

The easiest way to check the WordPress version of a WordPress powered website is when you login to your administration interface. The newer versions print out the version number in the bottom right corner – for example “ Version 4.4.1″.

Check your WordPress Version online from the readme.html file

You can of course also find out the WordPress version without beeing logged in. A standard wordpress installation will put a file readme.html in the root folder of your WordPress directory. This file is also updated automatically with every update you run. You can then easily open that file in your browser and check the version from there: mydoman/readme.html

How to check my WordPress Version online

Check your WordPress Version online: readme.html

One should however at least mention, that some experts think that keeping the readme.html file online is a potential security risk. Hackers could take advantage of the information provided through that file – so in some forums it is actually recommended that you should delete the readme file after a successful instalation or update.

I won’t stress too much about it for two reasons: First of all, you should always keep your WordPress website up to date – and take measures to make it difficult to actually hack your site. And on the other hand most of the attacks are probably automated attacks anyways. I don’t think that any hacker would actually take the time to check the readme file.

Check your WordPress Version with a line of PHP / a WordPress-Function

WordPress has a secific function that can provide additional information about your current installation: get_bloginfo(). This is probaly mostly intersting for theme developers and other coders, but can also come handy for designers. You could for example use this function to dynamically check the compatibility of a theme or a plugin against the current version.

Besically the function looks like this:

 <?php $bloginfo = get_bloginfo( $show, $filter ); ?> 

The parameter $show determines as what details should actually be shown – and with $filter  you can determine, how it should be shown.  es angezeigt werden soll. For a simple version check the following code snippet should work just fine:

<?php 
    $wordpress_version = get_bloginfo('version'); 
    echo("Wordpress Version: ".$wordpress_version);
?> 

So if you implement this function for example inside a temple, you will find your WordPress Version printed in that template.

Feel free to find out more about get_bloginfo(); in the WordPress Codex:
https://codex.wordpress.org/Function_Reference/get_bloginfo

What’s the use of using Social Media Buttons?

Recently a client asked my at add “these little buttons” to his website, shortly before it was about to go online. I basically advised him not to add any Social Media Buttons to his website – he reacted a bit surprised.

So I actually had to explain my recommendation not to add Social Media Buttons to him – which first was not really easy. And in the end it is probably equally difficult to aswer the question why you would want to add those buttons in the first place. What is the great advantage of using Social-Media-Buttons? Who is benefiting from those buttons? What are the actual advantages of of using Social Media Buttons – and what are the disadvantages?

Advantages of using Social Media Buttons

disadvantages of using Social Media Buttons

Popular Social-Media-Buttons with built-in counters

First you’ll have to acknowledge that Social Media Buttons are in fact very popular. Looking around the internet you may get the impression that almost every website offers at least some kind button-set visitors can use to share or like articles by just clicking some button. Buttons for sharing content on Twitter, Facebook and Google+  seem to be almost some type of obligation. And the potential benefit appears to be quite tempting: one click, and your article could go viral. New visitors, new readers, more clicks – who wouldn’t want that for his/her precious website? And all for free? Kind of – at first sight integrating Social-Media-Buttons with your webdesign seems to be free of charge. But to me the price I would have to pay would still be to high.

Disadvantages of using Social Media Buttons

Already the word “free” makes me hesitate. How could such a valuable service be free? Usually there is a price to everything – and with free Social Media Buttons it’s just the same. The first thing you are basically ask to do is give away some of your precious web estate for free. Not only that you might have to adjust your layout to look good with the buttons – you most likely also put the logos of some of the largest company on display – for free.

Additionally using Social Media Buttons the weight and loading time of your website will increase. And even if those big company do have ultra fast servers and connection, the still will be additional images and/or scripts to be loaded.

And – last but not least – with some buttons you even also give away some of your users’ data – for free. And at least to me this is probably the most important argument against the use of “Like-Buttons”. Even if you actually do not give away any data automatically, because you use some sophisticated script to protect your users’ data, you still give the impression that you might give away user data.

One general misconception seems to be, that there would be no or at least less social sharing without the buttons. But basically everybody knows how to copy and paste a URL – and most of today’s smart phone have some kind of built-in functionality that allows users to share a website with one click. And this way, sharing a link manually, people are probably also more likely to actually add a personal comment to the shared link – and in my opinions this would then again add way more value to your website than any fully automatic “free” Social-Media-Button ever could.

see also:

On Backup Strategies – World Day for Audiovisual Heritage

On 27 October the World Day for Audiovisual Heritage is celebrated. The UNESCO originally chose that special day to raise of awareness of the importance of preserving recorded sound and audiovisual documents such as films, sound and video recordings, radio and television programs as a part of the cultural heritage.

Why you need a Backup Strategy

Today many much of human kind’s audiovisual heritage is digital – and instead of calling it ‘preservation’ probably the more common term would be ‘backup’. So today the world does actually need working Backup Strategies for it’s cultural heritage. And somehow everybody know, that basically today everybody needs a working Backup Strategy to keep all those files safe we are gathering and producing today.

The loss of data can be a dreadful experience. The work of weeks and months just disappears, memories are suddenly gone, be it digital music collections or family photos – nobody really wants to lose those files. But installing a working backup strategy can be dreadful too.

If it’s ‘just’ a hard drive crashing, chances are, you find somebody who can actually recover those precious files. But dealing with theft, fire and flooding is a totally different game – then the data is most likely just gone.

Of course sooner or later also every web-designer and every web-developer has to develop his/her own strategy, how to deal with the problem. Depending on how you’re working you’ll have a copy of the most important project files online / on the webserver anyways – but still: having a working backup strategy is a must. In this post I’ll tr to draw a picture of my backup strategy – hoping that others my get inspired to start thinking of theirs.

USB-Sticks and CD-Roms

I once had to learn it the hard way, that keeping a backup on one (ONE!) CD-Rom is actually not a good idea. Since then I do consider CD-Roms and USB-Sticks not to be an option for keeping files safe. The risk of data loss is just too high – and there is also the risk that the data may fall into the wrong hands. So for quite some years I haven’t been using CD-Roms any more – and USB-Sticks are only used to actually get files from A to B.

Backups through Time Machine

Mac users are probably well aware of Apple’s backup tool Time Machine. A neat application that keeps an updated copy / backup of your computer for the rainy day. Or actually not for the rainy day – but in case your hard drive crashes, you most likely still have a bootable backup of your machine. Which is great. But it won’t help you in case of theft, fire or flooding. Chances are, the thief, the fire or the flood would just also take the backup drive.

Local Backups: keeping it simple

We are currently working with a rather large backup disk that is basically capable of storing all different the directories of the different computers that we really want to keep: work directories, photos, music etc. We do work on Apple computers – however but for backups we don’t use Time Machine. Instead we (still) use the good old work horse Carbon Copy Cloner. We have set up various scheduled backup tasks – and on a regular basis all the important files are copied to the backup disk.

The backup disk is dedicated to do just that – backups. No other files are stored on that drive, but backup files. This is an important detail since once you star mixing things up, chances are, that in the end you don’t have a full backup. Anyways.

However, having just one backup disk is (of course) just slightly better than having no backup at all – so we do have a backup of the backup disk. On a regular basis the backup disk is connected to an identical hard drive and we do a full backup of that backup disk. The second backup is then kept in a physically (and geographically) different place – the only way to avoid data loss in case of theft, fire and flooding.

Backups of websites and web-databases (mysql)

When looking for a web hosting service, one should also always consider looking at the potential web host’s backup strategy. Many hosting providers work with redundant systems – which means that basically once the webserver goes down, there is a second system jumping in.

Redundant systems are a good idea – but of course you should not rely on redundant systems as part of your backup strategy. The larger, the more complex, the more popular a website gets, the more important it is to have an actual working backup strategy in place.

So the least you can do is to download a database dump along with all the files on your webserver either manually, or automatically. This may sound a bit ‘cumbersome, but it is probably still the most reliable method. Making a manual backup you know exactly what you saved and when you saved it. In the long run however you will probably want to automatize this process.

Automatic Backups Solutions for WordPress, Drupal, mySQL

For content management systems built with either WordPress or Drupal there are various tools you can use to run automatic backups of your website. Actually there is a sea of different options, and it would be just too much for this article to start comparing the different options. Instead I’ll just list two different tools – the two tools I currently use on a regular basis. In the end everybody has to find his/her own backup tools and develop his/her own backup strategy.

  • Drupal: Backup and Migrate
    The Drupal module Backup and Migrate is probably the most popular backup tool for any website that runs on a drupal powered CMS. Already the name suggests its power: you can backup complex websites and even migrate them to a different server. The module offers ‘everything’ from a simple point-and-click instant backup option to complex scheduled backup tasks.
  • WordPress: WP-DM-Backup
    The WordPress-Plugin WP-DM-Backup or actually “WordPress Database Backup” is a rather rudimentary backup tool. You can look at the plugin as a comfortable wordpress interface for making database dumps – with a functionality similar to what phpmyAdmin has to offer. You can then either download the database dump manually, or set up a scheduled task for making dumps and sending them to you by email. You will however still have to download all files through FTP manually, to have a complete backup of your website – but at least with smaller websites that should not be too complicated anyways.

Basically a backup can only be as good as the method, the tool that you used to generate the backup. An easy to use solution is absolutely worthless, if the backup is not working. Or to put it this way: what do you need a backup for, if everything is lost anyways? So whatever approach you decide for – you should also check, if the backup is actually working.

On the fly website backups

Last but not least I’ll point out a backup toll, that is actually not a backup tool. But it recently helped me saving a client’s website from getting lost forever. One evening a client called me and told me, that he had a major misunderstanding with his previous webhost – and that one of his websites was on the brink of getting deleted. The ‘domain termination procedure’ had already started and within the next couple of hours the webspace / the website would be deleted.

I wasn’t at my desk – but I actually had my computer and a mobile internet connection with me. With no FTP access and no access to the the CMS my options were limited. I started the little helper app SiteSucker and simply downloaded a ‘static’ copy of the website to my computer.

About an hour later the webspace was deleted – and everything was gone. Already the next day we could actually reclaim the domain name, set up the webspace on our server and upload everything. To the public the website looked as before – the only thing missing was the content management system – but the client wanted to renew the website and the CMS anyways. Happy End.

CSS: How to jump to a differing anchor-position (vertical offset)

jump-anchor-offset

jump-anchor-offset - illustration / image by T.Bortels/cpu20.com

The initial question was: how to jump to an anchor, but have a vertical offset of x pixels?

Anchors are somthing like reptiles of webdesign – they are basically dinosaurs, but they’re still here. And they are here for a good reason: anchor links are easy to use and they do their job. You just click on an anchor link, and the page jumps right to the paragraph.

With the rise of one-page-layouts anchor links are becoming even more and more popular these days. There are lots of websites built on the concept of having anchors doing the navigation. When the website consists of only one page, there are not so many options left to actually navigate the page.

But often anchors are just a bit too accurate. When placed at the very beginning of a paragraph or a section or a headline, the jump will lead right to the very beginning of that paragraph or section or headline. This can lead to the odd situation that the detail you wanted to have in focus is actually at the top border of the browser’s viewport.

With the help of a little css magic a vertical offset can be added to an anchor. The actual anchor will then be placed x pixels above its actual position. To get this working the anchor element has to be positioned on an absolute position (position: absolute;) inside the element that you want to target. Here the sample code:

<div style="position:relative;">
    <div class="anchor" id="jump123" style="position:absolute; top:-100px;"></div>
    <div class = "mein_text">I should be 100px below where I currently am!</div>
</div>

Anchor offset in jQuery Masonry

Originally I needed this anchor-jump for a good old image gallery, that was organized by the jQuery plugin Masonry. The good news is, that the above trick actually does work well with jQuery Masonry. You just have to place the anchor inside an (invisible) div-element, that is inside the actual image container. Then you can move the position of the anchor outside the container for example by 100 pixels, as it is described in the above code snippet. This will then again bring the targeted image further down towards the center of the screen – the center of attention.


PHP array_multisort – sorting a multi-dimensional array as you like

I successfully avoided this subject for quite a while – but now I finally wanted to know: how do I sort a multi-dimensional array in PHP to my personal preferences? The quick answer is: with the nady little PHP function called array_multisort.

Why / When do I need to sort a multi-dimensional array?

Good question. Simple database queries are often just one-dimensional. For example you want to query a list of clients from a CRM System in alphabetical order – and a simple mySQL query can of course do that for you. In another context you might want to re-use the query – but this time order the list of clients by date of birth. You could just run another query – or instead you could re-arrange or actually sort the array you already have differently.

I actually have to deal with multi-dimensional arrays quite often – but in most cases it’s enough to sort them while I do the mySQL query. But in the long run it’s of course not the most elegant way to have extra mySQL queries just because you want your array to be sorted differently. While it may first look convenient, this approach sure is not very practical in the long run.

PHP array_multisort to the rescue!

As the name suggests the little PHP function array_multisort can elegantly do the job. No ‘expensive’ extra queries needed – your scrips will run faster and will be easier to maintain. So whenever you can re-use a db-query, go ahead and re-use it. You might want to thank yourself when looking at your own scripts moths or years from when you originally coded them.

One example for PHP array_multisort, just to get started: a database query gives me the following output:

Array
(
    [0] => Array
        (
            [id] => 369
            [name] => Peter
            [year] => 1969 
        )

    [1] => Array
        (
            [id] => 368
            [name] => Paul
            [year] => 1975
        )

    [2] => Array
        (
            [id] => 367
            [name] => Mary
            [year] => 1977
        )

)

As you can see the array contains some three records that consist of three fields: IDs, names and years. The array is ordered by the year. Now I would like to use the very same array, but order it by name. I just have to ‘pull the array apart’ and rearrange it according to my preferences, using array_multisort. The following little function will just do that:

$sortArray = array();

        foreach($entryArray as $entry){
            foreach($entry as $key=>$value){
                if(!isset($sortArray[$key])){
                    $sortArray[$key] = array();
                }
                $sortArray[$key][] = $value;
            }
        } 
    $orderby = "name";
    array_multisort($sortArray[$orderby],SORT_ASC,$entryArray); 
    
return $entryArray;

In this case $entryArray is my original array, containing the results of my original mySQL query. It may look a bit cryptic at first glance, but once implemented it actually works like a charm. After the reordering the array looks like this:

Array
(
    [0] => Array
        (
            [id] => 367
            [name] => Mary
            [year] => 1977 
        )

    [1] => Array
        (
            [id] => 368
            [name] => Paul
            [year] => 1975
        )

    [2] => Array
        (
            [id] => 369
            [name] => Peter
            [year] => 1969
        )

)

Very handy indeed.

See also:

  • PHP-Manual > Function Reference > … > Array Functions > array_multisort

Umlaut-Dots Ä too close to the letter (Mac-Firefox)

The problem only seems to occur in Mac-Firefox: the Umlaut-dots of the letter “Ä” are too close to the actual letter, so the letter looks wonky. The problem seems to be not arising in Mac Chrome nor in Mac Safari – the Umlaut-dots are separated from the letter / the letter has enough space between the “A” and the dots.

umlaut-dots too close to the letter

I was roginally using the webfont “MuseoSans” – but the problem does also occur when using “Equip-Light”. However when using “Helvetica” instead, everything seems to look ok.

The problem does not really occur with Umlaut-Letters “Ö” and “Ü” and it also does not occur with the small letter “ä” – it actually only occurs when the small letter “ä” is set uppercase using CSS text-transform: uppercase;. If I instead enter the ‘real’ uppercase letter “Ä” the problem does also not occur.

The problem seems to arise from a (mal-formated) PDF document. When the text is copy-pasted into the CMS the display error occurs. When the letter is rewritten ‘by hand’, the error does not occur. I had similar strange effects already some time ago – and obviously also other people are suffering from this strange behavior. At the moment I just don’t bother enough to do research on this subject – replacing the letters is good enough for me.

Of course I would love to know the actual problem – or the actual reason for this problem. So if you happen to know, what causes this, then please feel free to add you suggestion in the comments below…

WordPress: change image size, re-render all images

Another classic: the image size preset is set to 1024 pixel. At first everything is alright, while the project is evolving the CMS structure built, the website filled with content – images are uploaded. Then occasionally somebody involved with the project wants to add an image gallery or something similar, that makes you reconsider the image sizes. Maybe 1200 pixel width would look better in a lightbox slideshow – or you want to switch to retina ready images? But at that moment all previously uploaded images are of 1024 pixel width.

In Settings > Media you can easily change the image sizes for the three main presets Thumbnail Size, Medium Size and Large Size. All you have to do is change the size to the intended new size and save the settings.

Wordpress image size settings

While the new sizes will be applied to all new images, they won’t be applied to already uploaded images. Even is you open and edit an image, you’ll find the old presets.

Wordpress image details

When you’re first confronted with this, you’ll probably ask yourself, why are my new image sizes not available in the image settings? The reason for this is quite simple: the image sizes displayed in ‘image details’ are the ones that were already applied to the image. Once you upload a new image in WordPress, the current settings are applied to the image – the image is resized on the fly – and so you’ll actually have the image in these sizes on your server. The Display Settings Selector only reflects the sizes that are actually available.

You could now choose ‘Custom Size’ and re-insert the image. But that won’t actually resize the image – it would only scale it according to the custom size you chose.

Instead you better re-render all images in the new dimensions. This might sound a bit scary at first, but (of course) there is a (free) plugin available that does just that: Regenerate Thumbnails.

After re-rendering all images, the new image size settings should be available for all images.

Re-render / resize large number of thumbnails on the fly

Using the above solution to resize images / thumbnails can be a bit problematic when you have lots of images to re-render, since the plugin basically re-renders all images at once. That probably works fine with most websites – but when you have to resize hundreds or even thousands of images, the process may cause problems: depending on your server settings you may face time-outs – or the re-rendering process just never re-renders all images.

AJAX to the rescue!

The handy plugin  AJAX Thumbnail Rebuild also re-renders all images at all sizes – but using AJAX the images are re-rendered one by one, avoiding heavy server load and/or time outs etc.

Once installed you’ll find the interface right here: Tools -> Rebuild Thumbnails