El Capitan: Illustrator CS5 crash on quit / eyedropper tool [fix]

You probably found this article because you recently finally switched to El Capitan (Mac OS 10.11) just like I did – and now you find Illustrator CS5 crashing whenever you want to use the eyedropper tool or when you want to quit Illustrator. I know – this can be can be very annoying – I’ve been there. Done that. Fixed it. Yay!

The problem with Illustrator crashing on quit brings along another problem, which can be even more annoying than the actual crash on quit: the preferences are not saved. So each time you open up Illustrator, you’ll have to dig your way through the preferences panels. Not very practical – not very useful.

Both – the “crash on quit” problem and the “using the eyedropper tool” problem are actually rather easy to fix. You basically just have to rename two files – and that’s it. This includes some digging in the hidden Library folder – but in the end it’s not that difficult.

How to solve the crash on quit issue

First you need to quit Illustrator. Then you have to find the hidden Library folder and open it in Finder. There is actually two Library folders – one for the “Computer” and one for you. We’ll start with the one inside your user directory.

In the top menu bar (the one with the apple in the corner) go to “Go”. Push and hold the [alt] key and you should be able to see and choose the go-destination “Library”. Go there – and a folder should show up, featuring a lot of folders that you usually should not mess around with. Inside the Library folder go to “Application Support” > “Adobe” and open it. Inside that folder you should see a folder called “CS5ServiceManager”. This needs to be renamed to “CS5ServiceManager.bak”.

For the second file you need to go the the hard drive – or the folder called “Macintosh HD”. Inside that directory you should see  a folder named “Library”. Inside the Library folder go again to “Application Support” > “Adobe” and open it. Inside that folder you should again see a folder called “CS5ServiceManager”. This also needs to be renamed to “CS5ServiceManager.bak”.

Once both files are renamed you should be ready to go. Open up Illustrator and check for yourself: is it still crashing when you either quit or use the eyedropper tool? I hope not.

PS: I just re-discovered the original post that helped me solve this issue:

How to add a Caption to the Featured Image in WordPress

WordPress: Featured Image Caption

Featured Image Caption in WordPress - Pgoto/Screenshot: T.Bortels/cpu20.com

With most themes WordPress makes it really easy to add a featured image to an article / a post or a page. But although the image caption is often added correctly to inline images, it is often missing from featured images. So how can you add a Caption to the Featured Image in WordPress easily? And why do you need a caption after all?

Missing captions don’t have to be a problem for most use cases. But if you are using you WordPress installation as a CMS for some type of a magazine style website, you might want to – or even have to add captions to all images shown on your website – for example to give credit to the source of the image, the agency, the photographer – and to mention the license of the image. Some licenses require that you mention the license and the name of the photographer together with a link to the origin of the image. Then you’ll even have to add a bit of HTML to the caption. And as so often with WordPress the good news is that this is very well achievable with only a few lines of code added to your template files.

How to add a Caption to the Featured Image

When you add an image to your article / post or page either by first uploading an image to the media library, or by selecting one from the media library,  you can add a title, an alt text and a caption to that image. If you are like me you probably add those three little texts right when you upload an image.

First of all, remember to make the following adjustment inside your child theme. If you don’t use a child theme yet, now is the time. If you don’t know how to add a child theme to your WordPress installation you may first want to read this previous article: How to create a Child Theme for WordPress in Minutes.

In your template file (content.php or single.php or content-single.php or page.php etc) you would then need to find the section where the featured image is actually called. The respective code should be look similar to the following code:

<div class="entry-thumbnail">
    <?php the_post_thumbnail(''); ?> <!-- the featured image -->
</div>

Depending on the theme and/or template you might also find something like this:

<?php if ( ! post_password_required() && ! is_attachment() ) :
     the_post_thumbnail('large');
endif; ?>

Below the above code you would simply have to add the following:

<?php if ( $caption = get_post( get_post_thumbnail_id() )->post_excerpt ) : ?>
 <p class="caption"><?php echo $caption; ?></p>
 <?php endif; ?>

What the above code does is first check if you have a post thumbnail a.k.a. featured image at all – then also check if the image has a caption (“post_excerpt”). If both are TRUE a paragraph with the class “caption” is printed to the layout, echoing the actual caption.

You can then add appropriate styling to the caption to make it fit your theme design.

How to copy Apple Numbers Table to WordPress Editor

Today I have a rather specific tutorial for you: how to copy a table from Apple Numbers to the text editor of your CMS – for example WordPress?

Basically you can add tables to any text editor – whatever CMS you are working with. Some have a table function already built in, some need an add-on or a plugin to handle tables – but as long as you can access the source code of the text editor (of the text inside the text editor) you can add tables.

Working with tables inside the text editor of your CMS is quite useful – but it does not necessarily let you copy a table from another application, such as Apple Numbers. Actually there is no straight forward way to copy a table from Apple Numbers – but still this would be quite useful from time to time.

You can actually copy numbers and cells from Apple Numbers to the WordPress text editor – but you will lose the table structure on the way anyways. And what does a table look like without the table structure? It’s just a pile of numbers. Not very pretty – and not very useful. So you will need a ‘bridge’ to actually also copy the table structure correctly.

Using Text Edit as a HTML-Bridge between Apple Numbers and WordPress

Virtually every Macintosh Computer comes with a copy of the handy little application Text Edit. It might look not that useful at first, but every now and then it can come quite handy. Using Text Edit you are only two steps away from copying your pretty tables into the text editor of WordPress – or whatever CMS you might be using.

First you will have to mark all the table cells that you want to copy. In most cases this will probably be the entire table. Then you simply copy the table cells / the table into a new Text Edit document – formatted text has to be active. Once the table looks ok you can go on to the next step – saving the new document in html format.

Saving the document will give you the option to save the document as a website “.html” – you should see a pulldown similar to the following:

Copy Apple Numbers Table HTML to WordPress CMS

This HTML document will then contain the HTML source code you need to display your table on a website. So in the next step yo will have to copy the table section to your text editor.

Copying the table source code without an HTML editor

The easiest way to do this would be to open the HTML document in an HTML editor.  But it is also possible to copy the HTML code without an HTML editor at hand. You just need to open the file in a browser window either by dragging and dropping it into a new window, or opening it – keyboard shortcut cmd+o. Then you can look at the source code by using the keyboard shortcut cmd+u (Firefox) or cmd+alt+u (Safari).

Inside the source code you can use the mouse to mark everything from the first  “<table…” tag through to the last closing  “</table>” tag. Then copy cmd+c and paste cmd+v into the text view / source view of the text editor of your CMS.

Easy as 1-2-3, or is it? Well – at least it’s possible.
Any questions or suggestions? Please feel free to leave a comment below…

WordPress: edit Flexslider Interval “auto rotate” (Visual Composer Element)

Very practical: many WordPress Premium Themes come loaded with lots of mighty plugins that you don’t have to pay extra for. But sometime adjusting these plugins can become a bit difficult – and suddenly you find yourself with little or no support.

If you buy for example a license for the popular Theme Stockholm, then the drag’n’drop editor  Visual Composer and the slider plugins Revolution Slider and Flexslider and many others are included. So with little extra investment (mostly time) you can build pages with the visual page builder and even add sliders or slideshows to those pages – almost as easy as drag and drop.

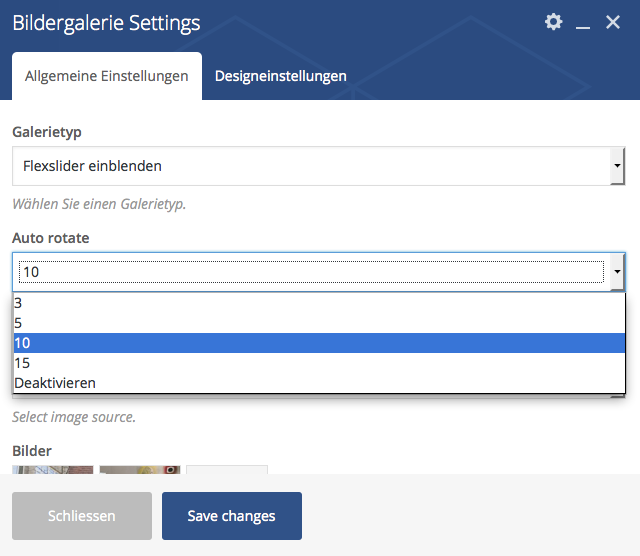
But – oh no – the Flexslider interval (“auto rotate”) that is defining the timing when the images are changed offers only four steps. The pulldown menu, where you can actually set the interval, features only options for 3 seconds, 5 seconds, 10 seconds and 15 seconds. Alternatively you can disable the “auto rotate” option.

In most cases these 4+1 options would probably be sufficient – but sometimes it’s the little details that make all the difference. And when you’re used to coding your own settings in milli-second-steps, adjusting a slider through the Cisual Composer interface can be a bit frustrating, to say the least.

Wordpress Visual Composer Slider edit intervalHelping a friend / colleague to set up a WordPress website, based on the Stockholm Theme + Visual Composer + Flexslider I recently had to find out that finding support for that kind of combination plugins can be a bit hard. First I turned to the Theme Developers – but they told me I should either contact the CV staff or try the API. Long story short: I didn’t get the support I needed. So I had to find my way through – which turned out to be easier than expected.

The slider is wrapped by a div that should look like this:

<div class="wpb_gallery_slides wpb_flexslider flexslider_fade flexslider" data-flex_fx="fade" data-interval="10">

If I choose “5 seconds”, the “data-interval” has a “5” – so I suppose the interval is actually defined by the number I see inside the “data-interval” and is then passed to the slider component.

So instead of hacking the interface of the Visual Composer, you can basically just switch to the source code view and make you adjustments right inside the shortcode / source code.

First you have to switch to the “Classic Mode” by clicking on the blue button above the editor. Then I would recommend to switch to the source code – although it is very wenn also possible to make the adjustments right in the classic editor window. But I prefer to make such adjustments where they belong – in the source code.

You will then probably see quite a number of different shortcodes, depending on the number of VC elements you already added to that page. You will have to look for a shortcode that looks like this:

[vc_gallery interval="10" images="22390,23006" img_size="full"]

Inside this shortcode you can set the parameter interval to whatever you prefer – for example 7 – so that the slideshow images would change every 7 seconds:

[vc_gallery interval="7" images="22390,23006" img_size="full"]

The Flexslider or actually the Visual Composer Interface for the Flexslider (as part of the Stockholm Theme) can not really handle this input – but the clideshow itself will anyways respect your input. If you later on decide to add or remove images from the slider, chances are that the interface will reset that option to 3 seconds. Then you’ll once again have to look up that piece of shortcode and add your prefered interval once again.

How to remove images from Google image search

How to remove images from Google Search

How to get your picture off Google? Screenshot google image search – Photo / montage by T.Bortels/cpu20.com /

It’s not easy to get your images listed on Google. But sometimes it’s even more important to know, how to remove images from Google. Why? Well – sometimes some of your pictures may be found by Google which were not meant to be found: private photos, test images, outdated pictures. Then you probably ask yourself, how to get your picture off Google? And how long will it take, until Google doesn’t show these images any more? Just recently I was asked to help in exact that type of scenario. Here is a simple guide that will show you, how we removed im

Why you would want to remove images from Google

This particular case was about a test page – a development environment, only used for testing colors, layout, ux details. The page was never meant to be found by Google – the images were never meant to be indexed. But the precautions were not really sufficient – the test page was just ‘hidden’ under a subdomain.

The URL of that subdomain was never submitted to any search engine, nor linked to from any other website. And you actually had to enter quite specific search terms if you wanted to find the test page and the dummy images – but you could actually find them – and that was not intended.

We never really figured out why the test page and the dummy images actually ended up being indexed by Google. but of course – they were indexed. My guess is that one of the plugins tried to do a good job – but in the end we will probably never really find out. Anyways. Things happen. Now we had to remove the images from Google – as quickly as possible.

Deleting images, reporting images – ask Google for removal

The fastest and at least to me also easiest way to get your images removed from Google image search goes like this: first you should delete the images off the web server – or at least you should block them in a way, that no search engine can ignore. Probably the most efficient blocking method would be to password protect the directory with a htaccess password protection.

Most hosting providers have a user interface in the administration area you could use to quickly block a directory. You could however also tweak the htaccess file you find in the root directory of your homepage. This way in less than a minute all images could be offline – quite handy if you are dealing with hundreds or even thousands of images.

If you don’t have FTP access and can not write or tweak a htaccess file you will probably have to delete the images through your CMS. But be aware that deleting them from the content area is not sufficient – in most cases the images would still be reachable in the image directory.

how to remove images from google

How to remove images from Google Index – screenshot of removal tool at google.com/webmasters/tools/removals

The second step is to report the images to Google – or actually to report that the images no longer exist and that they should be taken off the index. Google has put up a form where you can report images and URLs – but it can be a bit hard to find: Webmasters > Tools > Removal. You will need to login with a vaid webmasters account in order to use that form.

Basically only the person reporting the images has to be registered with Google’s webmasters program. The website, that contains the images you want to report, does not have to be registered prior to your removal request. All you have to do is first delete the images – or hide them behind a password protection. So from Google’s perspective you are basically helping them to remove invalid / outdated images from their index, improving the quality of Google’s search results. And basically every webmaster is welcome to do so, if he/she finds an outdated image in Google’s image search.

To actually report an image you have to first find the image in the image search results page and then right-click on it and copy the link URL. Then paste it in the URL removal form.

Here’s once again the direct link to the removal form:  Webmasters > Tools > Removal.

How to remove images from Google Search that are on someone else’s website

Removing images from Google that are located on a different server, for example someone else’s website, or a webserver that you don’t have access to, is a totally different thing. It is by nature a bit more difficult, than removing your own images – but it is still very well possible.

First you should check Google’s Removal Policies. The most important part of the Removal Policies is probably this: “We also remove content in response to valid legal requests, such as copyright notifications that meet the requirements of the Digital Millennium Copyright Act.” So if the image you want to remove from Google is covered in Google’s Removal Policies, go ahead and ask Google to remove the image from Google search results through this form. You will be guided through a few steps to clarify how / where the images can be found – and why you want it to be removed.

Since Google only shows what is already available online you should then also try to get in contact with the webmaster or technical support of the website where the image can actually be found and ask them to actually remove the image from the website.

Related posts:

Dedicated Hosting: good reasons to rent a Server

Dedicated Web Hosting: Web Server alley at All-Inkl

Dedicated Web Hosting: Web Server alley at All-Inkl – Photo / Copyright: ALL-INKL.COM

It’s not a secret: I do like Dedicated Hosting – and so we do rent a server – and not just server space. We have a so called Managed Server on which we run all our and our clients’ websites And we are very happy with it. because to me first of all renting a server means paying for stresslessness. Is that an actual word? Well – I hope you know, what I mean anyways.

Of course that server is not right here next to me in Berlin – instead it’s taken care of by the fine people of All-Inkl in Friedersdorf, Sachsen, Germany. We have been with All-Inkl for quite a few years now and we are still very pleased to be. First of all, this means less stress – or actually no stress for us, regarding the hosting details. Second we get good value for our money – and last but not least: everything is no fuss. It just works.

Why Dedicated Hosting? Because Web Design is bit like cooking

I’m not really a talented cook – or at least I’m not a very experienced cook. But I would still like to compare designing websites to preparing food. The quality and the taste of a good meal depends on different aspects: the ingredients are of course crutial, but so is the team,  the environment where you are cooking – and the tools you have at your disposal.

When you’re preparing a meal, the kitchen and its appliances is usually your environment – the infrastructure of cooking. When designing and/or running a website, your infrastructure probably consists of at least a desk, a computer, some programs – and a  Web Server.

Of course every cook can basically work in any kitchen – and every web designer could could basically work on any web server – as long as vertain conditions are met. But of course both cook and web designer feel most comfortable in their own environment, where they know how things work and where everything is. There’s no place like home.

Why should I rent a Web Server? Advantages of Dedicated Server Hosting

For our clients we are basically offering ‘everything’ you need to run a website. First of all we are of course designing and building websites – including a Content Management System that fits the clients needs. But ovr the years it has proven to be a good idea that we also can take care of much more: from researching and registering domain names to hosting – to support concerning email accounts, web statistic etc. – basically everything you need to actually run a website. Our clients can take care of their pressures content – we can take care of the technical details.

So basically – and technically we are Hosting Providers ourselves, while our core business remains designing and buildings websites. As designers we see ourselves as ‘problem solvers’ – service providers that take care of our clients needs.

For us Dedicated Hosting has quite a number of advantages. To sum it up very briefly: we know our Web Server – and our Web Server knows us.

Running a website on Shared Hosting or actually a Shared Server you would instead share one server with X neighbors – that means mostly websites you probably don’t know. One of your neighbors could run a script that would eat up the server’s processing power – another neighbor could run a website that would eat a lot of bandwidth – you just don’t know. Slow server response time? Try to find out, who is to blame, Sherlock!

I suppose such worst cases won’t actually matter, even if we had a shared server at All-Inkl since already the cheapest shared server account would only allow a maximum of 100 clients per server. but that’s still 99 neighbors. Anyways – I recently read that most of the hosting providers tend to stack their shared servers to the limit. Try a reverse IP-look-up and you’ll see, what I mean.

With Dedicated Hosting / a Managed Server you usually also gain a lot of freedom to configure things the way you want to – in ways that would never be possible on a Shared Server. You want to allocate more memory to a certain directory? No problem. Need a special PHP version? Got it.

Do you really need a Managed Server?

Of course not everybody needs a Managed Server – for most people / most websites that be probably a little over the top – and renting a Managed Server can also be a bit costly. The costs can easily add up and at the end of the year you’re facing a four digit invoice or the like.

But for us it was never the question if we could afford renting a Managed Server – the advantages  clearly outweigh the odds / the costs. But it is a good feeling to have everything up and running – it is actually running very smoothly. As I said in the beginning: no fuss. Our server has more than enough space and processing power than currently needed – we are happy and content – and our clients (hopefully/probably) too.

So maybe Dedicated Hosting on a Managed Server is not something for everybody, unless you are running a resource-hungry monster of a website. But if you happen to be a web designer / web developer that love’s to take care of things, wants to be in control and prefers to cook in his/her own kitchen, then you should probably consider renting a web server for you and your clients. I personally can only recommend it.

How to check the execution time of a php script

You have the feeling your website is slow? Some process is taking too long, something is not loading fast enough? Of course, there might be a script or maybe just a few lines of php slowing it down – but which part of the script is it? If you are witnessing for example speed problems with a WordPress Plugin, chances are that the plugin runs some loop inside a loop and/or maybe sending too many database queries. Reducing the number of database mySQL queries can dramatically speed up your page load time – but that will be subject of a different article. Anyways – all we need to know now is that there are ways to find out, which script or which plugin is executing slow – and how long it actually takes, to execute that particular piece of code.

Debugging or optimizing a script can be a time consuming task to do – so we’ll focus on those parts, that are the ‘most expensive’ ones – meaning the slowest ones. To find ‘time bandits’ inside your code all you basically have to do is start a timer before the suspicious script / plugin / module is executed – and then stop the timer once the script has done its job. And with PHP at hand it is not really complicated to measure the time that has past executing a piece of code – PHP code that is. Microtime to the rescue!

First you need to define a variable for the timer and start the timer before the script is executed like this:

$start_timer = microtime(true);

Then you stop the timer, after the script is executed like this:

$time_passed = microtime(true) - $start_timer;

You could then print the time that passed with a simple echo command:

echo("The script needed ".$time_passed." seconds to execute.");

If you want to round that number off to two positions behind the decimal point, you simply add the round command like this:

echo("The script needed ".round($time_passed, 2)." seconds to execute.");

So if you put everything together, it could look like this:

$start_timer = microtime(true);

// the suspicious code goes here
while … {

}

$time_passed = microtime(true) - $start_timer;

echo("The script needed ".round($time_passed, 2)." seconds to execute.");

PS: You may ask if speed optimization pays off? Is loading speed a SEO criteria? Is a slow loading website bad for SEO? And/or is a slow site bad for UX? All these questions can be answered YES. Good luck!

How to create a Child Theme for WordPress in Minutes

When you are creating a WordPress website, I would recommend you create and install the appropriate WordPress Child Theme right from the start. There are of course lots of WordPress Themes you can use as they are – well designed, fully functioning. Many so called Premium Themes offer a broad variety of different options to adjust design details, use a different font, change the colors etc. – and also many free WordPress themes offer basic functionality to adjust the design of the website, to stand out. However, whatever theme you may be using, there is often the need to do some additional adjustments. And this is when a child theme comes handy.

The easiest way to adjust a theme would probably be to edit the different templates and stylesheets directly. But that would also be the dirtiest way of doing this. Always remember: never hack the core! The next update will come and then all your precious adjustments may be overwritten – gone – and you’ll have to start all over again.

So actually the easiest way to do some quick adjustments is to create a WordPress child theme and then apply all the necessary adjustments to the child theme only.

Create a WordPress Child Theme in minutes

A few years ago it was a bit complicated to create a child theme. Nowadays it’s really just a matter of minutes to have a functioning child theme at hand, letting you change and tweak and twist whatever design details you would want to adjust.

How to create a Child Theme for WordPressBasically you only need to create two files – and then you’re ready to apply your own css to the parent theme, without changing it. Enough introduction – let’s get started:

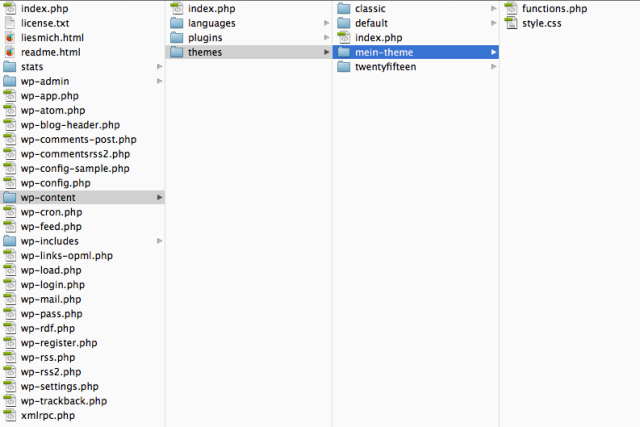
First you need to create a new directory inside the themes directory. This folder will then hold all files that your child theme will be working with. Best practice would be to name the folder according to your theme’s name – in this example the child theme will be called “My Theme” so we will name the folder “my-theme”.

1) Create the Child Theme Stylesheet style.css

Inside this new directory you will first have to create the main stylesheet for your child theme – the style.css. The following code is the minimal requirement for the child theme to work:

/*
 Theme Name:   My Theme
 Theme URI:    http://cpu20.com/my-theme/
 Description:  Twenty Fifteen Child Theme
 Author:       First_name Last_name
 Author URI:   http://cpu20.com
 Template:     twentyfifteen
 Version:      1.0.0
 License:      GNU General Public License v2 or later
 License URI:  http://www.gnu.org/licenses/gpl-2.0.html
 Tags:         light, dark, two-columns, right-sidebar, responsive-layout, accessibility-ready
 Text Domain:  my-theme
*/

What are all these details good for? Well – most of the details are not really necessary. But it’s considered good practice follow the standards and to provide at least basic information for whoever will have to look at the child theme in the future. Also these details will partly be visible in the WordPress Themes’ administration screen.

I usually name the child theme after the project or after the client, often followed by the year I created the child theme. Then everybody involved knows what the theme is about – and when it was created. Here’s some details about the the above theme info:

  • Theme Name is the actual name of the theme or child theme, as it is displayed in the admin area.
  • Theme URI is the web address where you could find further information about the theme.
  • Description should feature a short description about the theme – in this case it says that the theme is a child theme of the default WordPress theme twentyfifteen.
  • Author is of course the the author of the theme / child theme and  the  Author URI should point to a website where you could find further information about the theme’s author.
  • Template is the name of the theme directory of the Parent Themes that the Child Theme is referring to – so in this case it’s twentyfifteen.
  • Version is the version number of the theme.
  • under Licence and Licence URI you should find information about the license the theme is published under. In most cases this should be the GNU General Public License.
  • Tags let you describe the theme by tags / keywords. This can help to actually find the theme once it’s for example submitted to some larger theme directory.
  • Text Domain is important so that the theme becomes fully translatable. The text domain must not interfere with any other text domain used by other themes. Again using the theme’s name is good practice.

The first step towards our new WordPress Child Theme is made – now we need to connect both Parent Theme and Child Theme with each other. We will do that in the file functions.php…

2)  Create the Child Theme Functions file functions.php

The second file we need to get out Child Theme running is the functions.php, that at least has to contain the code to properly connect the Child Theme with the Parent Theme. The child theme could actually run without it – but then it would be a theme – not a child theme – and no styles of the parent theme would be apllied to your website.

Here is the code:

<?php
function theme_enqueue_styles() {

    $parent_style = 'parent-style';

    wp_enqueue_style( $parent_style, get_template_directory_uri() . '/style.css' );
    wp_enqueue_style( 'child-style',
        get_stylesheet_directory_uri() . '/style.css',
        array( $parent_style )
    );
}
add_action( 'wp_enqueue_scripts', 'theme_enqueue_styles' );
?>

What this code does: first the Parent Theme’s Stylesheet is loaded, then the Stylesheet of the  Child Themes is loaded. This first the ‘regular’ style expressions are applied to the templates – then these are either overridden, or additional styles are applied.

In the last step we have to actually activate the theme. If everythings is uploaded to the web server, you should be able to find the child theme under Appearance > Themes in the left side bar of your administration screen. Once activated, all styles should be applied to the website. Also all additional functions that you could add to functions.php should be applied.

You could of course still go a bit further. Basically you could every detail of your website – override every style your parent theme defines. You could however first add a screenshot of your website to the child theme’s folder. This is basically not necessary, but nice – it makes your child theme look more professional in the admin area. All you have to do is take a screenshot of your website, rename the file to “screenshot.png” and upload it to the child theme directory.

WordPress: moving from Server/Domain A to Server/Domain B

Whether you are building a Website or a WordPress Blog from scratch, or ‘just’ re-designing an existing one, it can be quite handy to first work on a development environment – that is a ‘not live’ environment – so you can tinker and twist your code as you like, without anybody else noticing it. Running a development environment under a subdomain is common practice and most of the hosting providers offer tools that make it easy to set up such a subdomain on your own webspace. When everything looks fine, all plugins are in place and everything seems to work well it’s time to move to the live environment.

But how do you move your WordPress Website to a new Server / new Domain?

Already a while ago I was writing about the basic concepts of moving a WordPress Blog from one domain to another. But that post was really more about the underlying ideas of moving a WordPress installation – and not so much about the actual process.

In this article I want to take a closer look at the actual process of moving from one web space to another – and also take a look at three WordPress plugins that can make that process a lot easier.

Standard Export-Import in WordPress

WordPress has some built in export- and import.functionalities that can already help moving a website from one webspace to another. One big disadvantage of this method: plugins or media will not be moved. And if you also want to change the actual domain name, you will have to adjust or repair the links of your pages and articles. This is nor very practical when moving a large website, but can be ok when you’re just dealing with some small portfolio website or the like.

Plugin #1: Akeeba Backup

The Plugin Akeeba compiles a  Backup of the complete website project – including all files and directories and of course including the database. Depending on the size of your project the moving can be done in a matter of minutes.

Since July 2015 the plugin is however not listed on WordPress.org any more. As far as I know there was some debate about the features of the free version, that used to be available on wordpres.org.

There is of course still a free version available – and it’s probably the most convenient if you check the features list yourself, in case you are interested: akeebabackup.com/download/backup-wordpress.html

Plugin #2: Duplicator

Another free option would be the WordPress plugin called Duplicator which seems to be quite popular – at least if you check the numbers and comments/reviews at wordpress.org. From the plugin page: “The Duplicator gives WordPress administrators the ability to migrate, copy or clone a site from one location to another. The plugin also serves as a simple backup utility.

Wordpress Duplicator: "duplicate, clone, backup, move and transfer an entire site from one location to another"

WordPress Duplicator: “duplicate, clone, backup, move and transfer an entire site from one location to another”

The setup of Duplicator can look a bit complicated at first sight. The plugin works with the metaphor of packages. Create a new package to get started.

You might first have to fix some permissions – 777 will do temporarily. The plugin then has a look at your database and will list all the tables it can find. So if you happen to have anything else stored in the same database, it will list also those tables – for example PiWik. You will probably exclude those tables from the backup since including them might bloat you database file without adding much useful data.

Sounds promising? It is promising You may download the free version of the plugin right here: wordpress.org/plugins/duplicator

Plugin #3: WP Clone

Also the plugin WP Clone lets you move a website from one web server to another – or from a local install to a web server. You will first have to install the plugin on the source and the target installation. In the admin panel of the source install you then choose ‘export’ and save the backup file locally. On the new location you then need to choose ‘import’ and upload the backup file.

But be aware: importing the backup file will reset your WordPress installation. It seems that some users were not aware of this – but this is a feature, not a bug. And also be aware of the following disclaimer: “WP Clone fails in 10-20% of installations. As such it is NOT intended as a regular backup method, its strength consists in migrating WordPress installations. The failures appear to be related to the multiplicity of WordPress hosting platforms and the size of the installation rather than the WordPress version“.

You can donwload the plugin WP Clone by WP Academy through wordpress.org right here: wordpress.org/plugins/wp-clone-by-wp-academy

Conclusion: the above plugins are mainly designed for cloning and moving a complete WordPress website / WordPress blog. They are however not meant to be used for backups. If you are looking for a complex but easy to use solution to move a WordPress Installation, either of the above plugins can come handy. I would however still recommend to do it ‘manually’ by moving the database and the files and plugins separately.


Need support designing, installing or moving a website? I would be glad to help. You can contact me through the contact page.

Avoid 404 errors – find broken links and repair them

When you are building a new website from scratch, all links should of course first work just fine. There is basically now reason – or let’s rather say no excuse for broken links in a fresh setup. All internal and external links should be checked and there should be not a single broken link on a fresh install.

When you are instead moving moving or even relaunching a website, things are quite different. Chances are that sections have changed, URLs are different – or some small pages may be combined to one larger page. Then you should try to ‘save’ potentially valuable links, for example by redirecting them properly trough 301-redirects inside the .htaccess file of your website. But these are not the subject of this article.

Why Website-Care / Website-Maintenance is important

In this post I want to look at websites, that have been up and running for a longer time period. Articles and pages have been added over the years, internal and external links have been set. The problem is: over the years URLs may have changed, pages may have been deleted. Some of your links may be outdated – the number of broken links is slowly but surely rising.

You may first not realize you have a problem. But while the number of broken links is rizing, your website’s reputation may drop. Both users and search engines don’t like dead links at all. Dead links are bad for UX and bad for SEO.

And even if it does not appear to be a problem at first sight, because ‘nobody’ is looking at your old articles anyways… Well – the reason why nobody is actually looking at those old articles might be the high number of broken links.

So both for UX and for SEO it is a good idea to have a closer look at you website from a spider’s point of view and check all those precious links you once set. I don’t like the term myself, but let’s call it Link-Checking. But this can be a lot of annoying and (even worse) time consuming clicking, right? Of course there are some friendly bots or actually spiders that can do the job for you.

Link-Checking: how to find broken links and avoid 404 errors

First things first:

  • Link-Checking is done best by some bot / spider / app – not manually. Even if your website is that that large, it may take hours or even days to actually find and check every link you once set. And chances are that you will not even find every dead link.
  • Link-Checking is best done from ‘outside’. Consider Link-Checking something like an automatic site critique – and the best critics are often not the once that are running the system. So even if you CMS is capable of checking links, you are probably better off with an external service.
  • TLDR / my favorite free service at this moment: deadlinkchecker.com

WordPress Plugin: Broken Link Checker

As far as I know there is currently only one WordPress Plugin that is capable of finding and listing broken links on your “WordPress) website: the Broken Link Checker. One disadvantage jumps right into my face: the Broken Link Checker can currently not check sidebars / widgets for broken links. This non-feature make the plugin actually useless for my use case.

Additionally the plugins has received quite some negative ratings for being resource hungry. There seems to be a serious performance problem when checking larger websites for dead links, up to server unavailability – the server might just not accept any further requests, shuts down, gives an error 500. Something I would not want to see on my website.

If you want to test the plugin anyways you’ll find it here: wordpress.org/plugins/broken-link-checker

Find dead links with Screaming Frog SEO Spider (Cross-Platform Program)

First the good news about the program Screaming Frog SEO Spider: the paid version seems to be a really complex application that enables you to do much more good for your website than just link checking. And it is available for Mac OS, Windows and Linux. The bad news: the free version of Screaming Frog SEO Spider is almost useless.

I have downloaded and installed the free version of Screaming Frog SEO Spider and tried what you can actually do with it. It is a stand alone application and you could basically use one license to check any number of websites ‘from the outside’. The only draw back is that you can only check one URL at a time. So if you only want to check your links page, it may be worth installing the free version. But if you want to check more URLs, then the free version is just not an option.

The paid version appears to be a mighty chunk of software – a SEO suite for professionals that regularly need to perform various tests on a number of websites. To me this is a bit over the top – and with a price tag of $99 per year it is just a bit too expensive for my rather basic needs.

If you want to test the program and/or download the free version: screamingfrog.co.uk/seo-spider

Find broken links with integrity (Mac OS Stand Alone Program)

The program integrity from Peacockmedia is a beautiful little piece of software. The interface design is cleanand compact and analyzing links is basically possible within the free version of the tool. You just need to enter the URL of the website you want to analyze and then it will take a few minutes until the tool has analyzed the website for broken links.

You can then get a list of all links – or just all broken links, responsible for the  404 errors. The sorting and filtering options of integrity lets you filter the results by response / error message.

One draw back: the tool will only list linked websites and pages – but not other files like JavaScript or webfonts and the like. Also feeds (RSS/XML) are not listed. So while the tool is actually quite good in giving a quick and direct answer to the question, what links are causing 404 errors, the tool is not good for a deep analyzes of all links assets.

You can find the tool here: peacockmedia.software/mac/integrity

Online Service: Link-Checker by w3.org

Next I took a look at the official link checker tool by w3.org. First a few advantages: the tool is free to use, no registration needed, no fees, no fuss. And the tool is a serious link checker: it basically checks everything it can – and that may take time.

Disadvantages: it can take quite a while until the link checker tool has analyzed a website for broken links. No doubt, the spider does its job well – but for my taste it does its job just a bit too well. So for a first test it could be a good idea to check the “Summary only” option. In some cases people report that the tool made their webserver break down – and you don’t want to get an error “500” looking for “440” errors.

If you want to test the tool anyways: validator.w3.org/checklink

Online Service: Dead Link Check

The Dead Link Check is another free online tool that lets you search your website for broken links. You just need to enetr the URL – then a CAPTCHA check. The the tool statrs analyzing…

After about 2500 pages you may get another CAPTCHA check – and if you have a large website to analyze, you may get more CAPTCHA checks on the way. In the end you get a listing of all problematic pages.

The link report does also list broken links to assets like JavaScript files, CSS files, webfonts and the like. This can come very handy since the options of finding broken links to assets are otherwise limited. For example: I head to learn that one WordPress plugin was generating feeds for a custom post type – but the feeds were not accessible. This led to literally hundreds of broken links, probably only visible to search engines. The solution to fix those broken links is documented in this forum post. Without the link checking I would probably have never found out that I had a problem in the first place.

Here is the tool: deadlinkchecker.com

Favorite Tool: Online Broken Link Checker

Also the Broken Link Checker is a free online tool. Running the broken link analyzer can take some time – but in the end it does pay off.

The Broken Link Checker is probably a bit faster than the Dead Link Check. The report is however not as detailed, but still it is a good option to run a test every now and then. It does its job.

Here is the tool: brokenlinkcheck.com

…well then… Happy Link-Checking! :)