WordPress as a CMS: Custom Content Types and Templates

WordPress CMS: Custom Content / Types

WordPress CMS: Custom Content / Types - Photo / Illustration: T.Bortels/cpu20.com

WordPress is not only a great tool to easily install and run a blog- or news-website, but can also be altered to serve as a Content Management System: WordPress as a CMS. But what makes WordPress a CMS? To me the most important feature is probably that I can expand WordPress’ functionality with additional custom content types.

However – first thing that annoys me a bit is that in WordPress ‘Content Types’ are called ‘Post Types’. This suggests that everything in WordPress generally would follow a ‘Post-Mataphor‘ – which I would find great. But then again a look in the left sidebar of the admin section tells me that WordPress originally distinguished between ‘Pages’ and ‘Posts’. So a ‘Page’ is a Post Type – but a ‘Post’ is also a Post Type. Oh well.

What makes WordPress a Content Management System?

The ability to establish and theme (style) different custom content types (or ‘post types’ in WordPress jargon) is probably the most crucial key feature that makes a CMS what it is: a Content Management System. If you want to manage content (and not just ‘post blog entries’ and ‘pages’) you will sooner or later need to draw lines between the actual content types you’re dealing with. On the website of a record label, an Artist is a different content type than a Release or a Song or a Concert or – an ‘Info-Page’.

Wordpress CMS: Custom Content Type

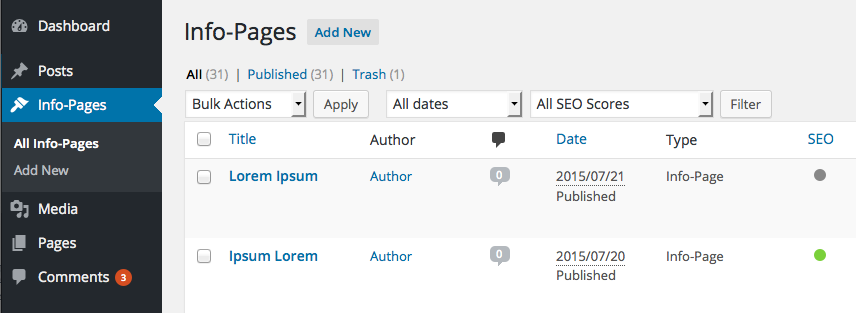
WordPress as a CMS: Custom Content Type ‘Info-Pages’ in WordPress (overview)

Different content types are often basically different data types – or different sets of data. To bring meaning to these data types they need to be handled differently. And this is only possible, if the CMS can actually handle different content types. Along might also come the demand to use different template files to give the different types of information each a different representation: different style, different layout, different template file.

Describing the custom content type in a function

The following code has to be added to the theme’s functions.php file:

function my_custom_content_type() {
$labels = array(
 'name'               => 'Custom-Info-Pages',
 'singular_name'      => 'Custom-Info-Page',
 'menu_name'          => 'Info-Pages',
 'name_admin_bar'     => 'Info-Page'
);

$args = array(
 'labels'              => $labels,
 'public'              => true,
 'exclude_from_search' => false,
 'publicly_queryable'  => true,
 'show_ui'             => true,
 'show_in_nav_menus'   => true,
 'show_in_menu'        => true,
 'show_in_admin_bar'   => true,
 'menu_position'       => 5,
 'menu_icon'           => 'dashicons-admin-appearance',
 'capability_type'     => 'post',
 'hierarchical'        => false,
 'supports'            => array( 'title', 'editor', 'author', 'thumbnail', 'excerpt', 'comments' ),
 'has_archive'         => false,
 'rewrite'             => array( 'slug' => 'custom-info' ),
 'query_var'           => true
 );

register_post_type( 'custom_content_type', $args );#
 // flush_rewrite_rules();
 }

add_action( 'init', 'my_custom_content_type', 0 );

Custom Post Type Templates in WordPress

Basically all that needs to be done is to define a new Page Type either in the theme’s functions.php file, or through a custom plugin, as described above. There are probably zillions pf plug-ins that will introduce new content types – and many ‘pro themes’ bring along their own usage-specific Page Types like ‘Artist’ or ‘Concert’. But in the end I suspect you will actually want to define your own Post Types according to your or your customers’ requirements. I will describe both ways more detailed in upcoming posts – this article is just a brief introduction into the subject. The actual content type definition is however always the same: first add a function, that describes your new custom content type – then initialize the function.

Then in a second step you can add a new template file to your theme folder that will take care of the representation of your new content type. You can just copy the template file “single.php” and save it with the name of your content type added to the file name like this: “single_custom_content_type.php”.

You can basically do everything inside this file. I would however recommend you also alter template file “content.php” so that it suits your needs.  This will however only get loaded, if you add or actually alter one line of code inside the template file which tells the template, what content to load.

So inside of “single_custom_content_type.php” instead of this:

<?php get_template_part( 'content', get_post_format() ); ?>

you should have the code altered like this:

<?php get_template_part( 'content', 'custom_content_type' ); ?>

…suggesting you have the template file “content-custom_content_type.php” already in place.

Advantages of Custom Content Types

Even without custom fields, custom styles or custom whatsoever you have already quite some advantages instantly at hand:

  • The pager respects the new content type – visitors to your website can now browse from page to page (previous / next) inside that content type. This can be already quite handy in so many situations when you simply want to separate different types of pages from each other
  • The sidebar in the admin section now has some new functionalities that let you easily add and/or edit pages of that new content type. And there is also an overview with integrated search for that content type only.
  • Pages of the new Content Type can have they own ‘slug’ as defined in the function under “rewrite”. This gives the pages of that content type automatically a meaning to both users and search engines. Additionally this can make things easier when looking at web-statistics generated by tools like PiWik or the like.
  • And last but not least: you can add fields and doing so build the content type that suits your data structure, your content,  your needs.

Changing Content Types for existing Pages

Often the situation is like this: you have a WordPress installation, you have some posts, you have some pages – lots of pages. You are basically happy with what you have – you ‘just’ want to add a new content type – and change the content type of some pages that already exist to that new content type. Good news is: the is a Plugin for that! The Plugin Post Type Switcher (wordpress.org/plugins/post-type-switcher/) simply lets you switch post types on a single post (page) basis. Since recent there is also a bulk switcher option so you can ‘move’ several pages from one post type to another without editing each page separately.

Free VPN Services vs. Security

I recently (again) did a quick research on free VPN services. My prefered setup would have been a free browser plug-in based VPN that wouldn’t require registration. I would basically just need a VPN-Service to check some websites that seem to have different content, according to the country it is accessed from.

Why do I need a VPN? How does a VPN work?

I find VPNs are a great invention – but they can be a bit scary, when you take closer look at how a VPN actually works. This is even more the case if you’re having concerns about security issues. VPN stands for Virtual Private Network. A VPN service usually allows the user to access websites or services through their proxy servers. This means, even though I am located in Germany, to a web server I could look as if I came from a different country.

Well – anyways. A quick research led me to the service called Hola – but after reading this article about technical security problems with Hola that could either be bugs or even features, I dumped the idea again:

Long story short: the ‘bugs’ inside the Hola browser plug-in lets attackers easily take over somebody’s computer. Practically this would mean that thousands or even millions of ‘infected’ computers could be ‘hijacked’ by an attacker and useed / misused as a ‘bot net army’. This army of remote controlled computers could then again be used for DDoS-attacks and the like. Not good.

So probably the best alternative would still be the service called freedome from f-secure. The service is not a free service – and it is subscription based. Both I originally wanted to avoid – but probably this is still the best solution. At least it looks way more secure and reliable than most free VPN services. I know I like F-Secure – I will probably also like their VPN service Freedome.

Advatages of using a VPN service

It’s basically rather easy: using a VPN service you virtually become untrackable. And that has some great side effects – or actually advantages:

  • As I mentioned before you could then visit websites that are using geo-blocking to block or grant access to users from specific countries or regions.
  • As a web developer / webmaster you even may have to implement some geo-aware solution yourself. Then a VPN service can be handy to test such features.
  • Some services and ad networks use ‘super cookies’ that allow them to track users across different websites, even if the user does not accept any cookies. With a VPN such tracking practice is close to impossible.
  • Using a  VPN can also have security advantages, since you’re not accessing the internet directly – but indirectly through the VPN’s servers.

I guess I will take Freedome for a test ride and then report back on a future article.

See also:

Drupal: how to re-order Scald Contexts editor-friendly

I use the Scald module on some projects to add images to a CKEditor powered text field. I like the Scald module very much. It gives the editor the freedom or re-using images or actually all kinds of meda across the website while providing a media pool for easy access to all previously uploaded media. Every photo, every image gallery, every video ever uploaded to a website is accessible from every Scald-enabled node. No redundant media, less searching for images, more time for actually writing good articles and maybe even an extra break.

Additionally Scals gives the editor different display options for images, triggered through scald contexts. So for example the editor may choose to have a ‘full width image’ and later change the context to ‘inline image’. This can help getting the workflow organized when working in teams – but it also helps to separate content from code.

This basically this all just works just fine – but when having a couple of ‘contexts’ up, it can be a bit annoying that I can not determine in which order the contexts are presented in the modal window that lets editors change the image’s Scald context. So after a while it can become a bit messy:

Scald-Contexts list of Image-Formats

I would love to have the Scald contexts either ordered alphabetically or ideally manually by drag-and-drop. Currently the contexts seem to be ordered chronologically. So at the moment the first context I created is first in the list – the latest context is last. Some of my contexts are close to others and I would need to have them appearing accordingly close to each other – in the above screenshot it’s “Partner–Logo (160px)” (which I created earlier) and “Partner-Logo (200px)”.

I recently opened an issue at drupal.org regarding this feature request – but I only have half-good news: “You can alter the list of contexts with hook_scald_wysiwyg_context_list_alter –– check the scald.api.php … “. Well – yesss. I guess for now I’m fine with how the list is displayed – but will have a look at this in the future whenever I might run into this particular problem again. Here’s the issue: ‘How to re-order Scald Contexts’ https://www.drupal.org/node/2514352

Workaround: I figured out a way how to kind-of re-arrange the order of Scald contexts to have it a bit more editor-friendly. It is actually a bit risky – but just a bit. Here’s the quick’n’dirty how-to: since all custom contexts are in chronological order, you can kind-of determine the order by deleting and re-installing selected contexts. This will first break your articles – or actually only the images won’t be shown for the time when the corresponding context is not available. But once you re-add the context again (with identical name) all images are back in place – and the ‘new’ context is now at the bottom of the list since it’s the one that was added latest. Hope this helps.

to be continued…

WordPress: load PiWik statistics tracker script only for guests

Counting website visits with the open source tool PiWik is becoming more and more popular. PiWik is easy to install, easy to integrate with WordPress, Drupal, or any other CMS. The data reports can be self-hosted so they are all yours – and it’s free. The only thing about PiWik (and other website statistics tools) that used to annoy me was that I never knew if I really had that many visitors, or if it was just me. Of course: PiWik has an option to set a cookie “it’s me” so that your own visits would be ignored – and that is a good workaround if you happen to run your website on a self-coded basis that is not aware that it’s you, because it lacks of a login or the like…

With WordPress you actually have a system that can be aware at least if the visitor is currently logged in, or not. And there is quite a number of free Plugins that distinguish between ‘you’ and ‘the others’ by checking if the visitor is logged in, so only visits of real visitors (guests) are counted, but not visits of editors and administrator. That is of course great, but in most cases I just want to implement PiWik – and that’s it. So I usually just copy-paste the PiWik code snippet into the footer of the WordPress theme and all is fine.

Just placing the PiWik tracking code in the footer.php of your WordPress theme would then again make PiWik count every visit – so also my visits to the site. To avoid this, there is a small handy WordPress function ‘is_user_logged_in()‘ that checks if the current user is actually logged in – or not. Adding a “!” to the function will make the following code only get rendered, if a visitor to your website is not logged in. So for example administrators and editors will not get tracked by PiWik:

<?php wp_footer(); ?>
<?PHP if ( !is_user_logged_in() ) { ?>
<!-- Piwik -->
<script type="text/javascript">
...
<!-- End Piwik Code -->
<?PHP } ?>
</body>
</html>

Drupal CKEditor Custom Text Styles

Usually you should be able to add the ‘Styles’ button to your prefered CKEditor Profile by drag’n’drup in the ‘appearance’ section of the corresponding CKEditor profile. Then you could customize the ckeditor.styles.js which should be located in sites/all/mytheme/ckeditor.styles.js –– BUT there is an incompatibility between jQuery and the CKEditor Profile editor.

So in order to get this work, first jQuery has to be ‘downgraded’ to V.1.7, preferably  through jQuery update. This of course makes the whole idea of having a module called “jQuery update” appear to be a bit strange – but that’s how it seems to be. At the moment.

Once jQuery is downgraded, the CKEditor profile editor works. That let’s you drag’n’drop the ‘Styles’ button into the interface. And that again makes use of the ckeditor.styles.js which can then be adjusted according to personal preferences.

If the custom styles still don’t show up then “flush all caches” may help. Also clearing browser cache is recommended since the JavaScript files involved can be a bit sticky.

jquery: how to unwrap text if a link href is corrupt (“un-link”)

Sometimes you may need to unwrap some text from an html element – with jQuery you can do it even after the document is already rendered.

Over the years the free JavaScript library jQuery has become very popular among both web designers and web developers. For some it es something like the Swiss Army Knife of webdesign and front end development. And for me it came in very handy when I had to deal with pre-formated html documents that I needed to clean up.

In these documents I have lists of items and basically all should have a working link wrapped around an image. But of course some items don’t have a link – or actually the link is there, but it’s pointing to a page that does not exists. Others items don’t even have an image. Since the html code is as it is, I have no way to check it or alter it on the sever, before it’s rendered, using a php snippet – so I have to do the clean up on the client side through a small jQuery code snippet instead.

This is the actual html code I’m refering to: two entries – first one with a corrupt link (“/node/EMPTY”) and a corrupt image (“/images/EMPTY-thumb.JPG”). The second entry has a working link (“/node/NUMBER”) and an image (“/images/NUMBER-thumb.JPG”). You will notice there is actually a url inside the link tag and an image path inside the image tag – but both are corrupt and lead nowhere. So I need to unwrap the contents of those corrupt links with jQuery: first look into the actual link, check if it’s corrupt – and eventually throw it over board.

<div>
<a href="/node/">
<div>
<img src="/images/-thumb.JPG"/>
</div>
<div>term A</div>
</a>
</div>
<div>
<a href="/node/64207">
<div>
<img src="/images/64207-thumb.JPG"/>
</div>
<div>term B</div>
</a>
</div>

The following code is the jQuery function I originally used to unwrap the link tag “a”. It does actually remove the corrupt link on the first item, but it also removes the link from the second item, of any other following item, if any corrupt link tag is found:

// remove corrupt links
$("a").each(function() { 
var href = $(this).attr("href");
if(href == '/node/') {
$('a').contents().unwrap();
}
});

So instead of unwrapping all the following links, the function should just unwrap ‘this’ link tag that is actually corrupt. So instead of this:

$('a').contents().unwrap();

it needs to be this:

$(this).contents().unwrap();

So in context the function looks now like this:

// remove corrupt links
$("a").each(function() {
var href = $(this).attr("href");
if(href == '/node/') {
$(this).contents().unwrap();
}
});

What it does, is:

  1. loop through all links
  2. put the content of href into the variable ‘href’
  3. check if the link consists of ‘/node/’ only
  4. unwrap the contents of this link – leave the previously linked contents an-linked

…so with this little twist the above jquery snippet actually only unwraps contents from the corrupt links – so in my case the link is removed from the picture.

…done.

PS: The above use case is quite a special case – you could however also use this method to unwrap or re-wrap text from inside a div container (or whatever container).

See also:

related links:

Scald: theming atom reference images – where to find image path

For a Drupal 7 project I use the image and assets management module Scald. I find the handling of module rather comfortable: it lets the editor choose so called media atom from a media pool and insert them into CKEditor either by drag’n’drop, or by using the ‘insert’ funtionality of Scald.

The module comes along with a field – the Atom Reference – which half works like an image field, half like an Entity Reference field. But finding the actualy image path first was a bit tricky: when printing the node array, you’ll just get the SID for the referenced image, but no details – they’re loaded through the scald function ‘scald_atom_load’.

This gets the SID from the node’s array:

$img = $vars['node']->field_teaser_image['und'][0]['sid'];

SImilar to ‘entity_load’  this fetches the atom reference’s object:

$atom = scald_atom_load($img);

This is how I then load the title of the atom reference image inside template.php:

$vars['img_title'] = $atom->title;

And the actual filename is inside another object base_entity:

$vars['img_filename'] = $atom->base_entity->filename;

Found the solutions through this scald issue. Took me a while – hope this may help somebody else some day.

iPhoto: How to play a slideshow in random order

Scenario: In iPhoto you have a folder full of photos that you want to turn into a slideshow – only you would want to play the images in random order. But: there is actually no ‘preset‘ for “random order” or “shuffle mode” in the iPhoto preferences panel – and you ask yourself, if it is actually possible, to play an iPhoto slideshow in random order at all?!

This may first occur a bit strange, but it does actually make perfect sense. Let me explain: you probably don’t really want to have your images played in random order all the time. Instead the random play option is available on demand or actually on play – which means  you can switch to random order (“shuffle order”) while the slideshow is actually playing. Here is how:

How to play an iPhoto slideshow in random order

First you obviously have to have a slideshow you want to play in random order. So in the iPhoto sidebar under ‘slideshows’ you either right-click and choose “New Slideshow” or go to “File > New Slideshow” from to menu bar. Add some picture you want to play by draggin and dropping them from any of the image overviews. Then press ‘Play’.

While the slideshow is playing, move the mouse pointer to make the slideshow controls appear. Then click the settings button, that looks like a cog wheel icon, next to the close [X] button:

iphoto slideshow random order - shuffle preferences

random order slideshow preferences in iPhoto

Clicking the settings button in play mode will then open an extended preferences panel, featuring an additional option “Shuffle slide order” in the lower third of the panel:

iPhoto slideshow random order option

iPhoto’s random order slideshow option “shuffle slide order”

Ticking (Checking/unchecking) the option “Shuffle slide order” will toggle the shuffle mode.

You can find a detailed description on this page “Change slideshow settings“at support.apple.com – it’s written for iPhoto 9.5 but should also apply for iPhoto 9.6 and other versions as well.

iphoto slideshow manual orderIf you instead want to determine the order of the slideshow manually, you can drag and drop the images in the order you prefer at the top image bar.

Hope this short guide helped a bit. Cheers!

Drupal: CKEditor toolbar inactive for other roles than ‘administrator’

I suppose it probably is some permissions problem.

screen-shot-2015-03-27

to be continued…

CKEditor for Drupal 7 Installation Process (Open Source Version)
http://docs.cksource.com/CKEditor_for_Drupal/Open_Source/Drupal_7/Installation

How To Set Up the CKEditor Module In Drupal
http://tomandcrystal.com/how_to_set_up_the_ckeditor_module_in_drupal

Drupal: SCALD modal window loading problem [solved]

The SCALD modal window ‘loading’ wasn’t loading. It took a couple of days (hours) and an embarassing long discussion on drupal.org to find the error – which was not an error. It was ‘just’ a problem of re-declaring something, that was already declared before.

The short version:
“The WYSIWYG module was detected. Using both modules at the same time may cause problems. It is recommended to turn the WYSIWYG module off (click here to disable).”
[reading (and understanding) a warning on the CKEditor profile page can actually be useful!]

The long version: …to be continued…

The documentation of the bug hunt: https://www.drupal.org/node/2454845